
Accessing the Web Server
To view the web server, you will need to set up Ethernet connection.
- Type in the IP address and http port to access the meter through the web server.
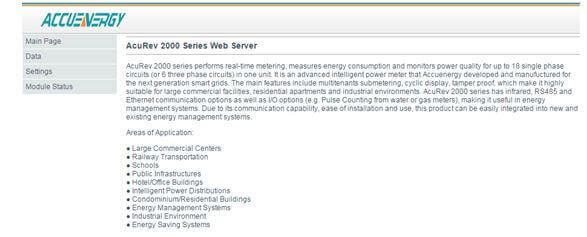
Figure 1: Main Web Server Page
Once you are on the web server place your cursor over the ‘Data’ section, and a list will show up. Click on the sub-section that correlates to the data you will like to view:
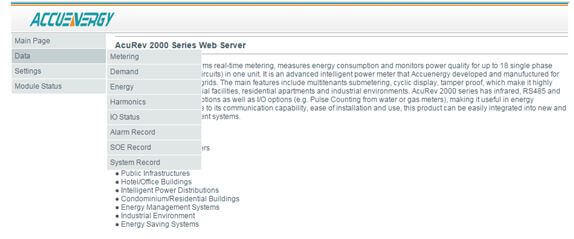
Figure 2: Accessing Data from the Web Server
- Metering: This shows real time readings such as voltage, current, power and etc. for the system and for each user by selecting the user from the dropdown box.
- Demand: This shows the demand readings for the system and for each user by selecting the user from the dropdown box.
- Energy: This shows energy readings such as import energy, export energy, total energy etc. for the system and for each user by selecting the user from the dropdown box.
- Harmonics: This shows data such as THD, THFF, different order of harmonics etc. for the system and for each user by selecting the user from the dropdown box.
- IO Status: This shows the status for different I/O Modules e.g. relay status, DI status etc.
- Alarm Record: This shows the alarm log for the alarms triggered on the AcuRev 2000 series.
- SOE Record: This shows the Sequence of Event log based on the Digital Input status.
- System Record: This shows the system events with timestamp.
Click ‘Settings’; a password page will display
- Type in the password (The default is: 12345678) and click ‘Submit’. The Network Settings ‘network parameter configuration’ page will be displayed.
- Put your mouse over “Settings”; a drop down list of Settings will be displayed.
- Click on the relevant settings to access the page.
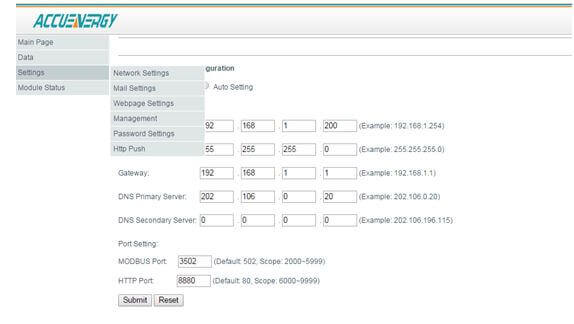
Figure 3: Accessing Settings from the Web Server
Web Server Network Settings
You can change the configuration of your network parameters.
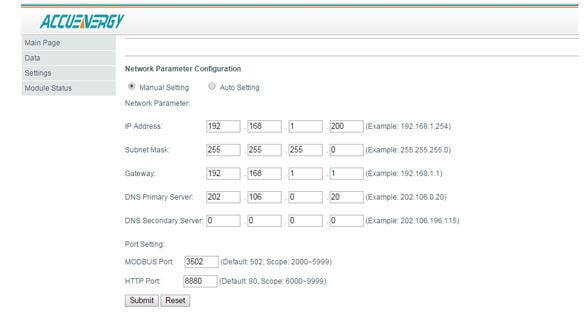
Figure 4: Network Parameter Configuration
In the Network Parameter Configuration select:
- ‘Manual Setting’ to manually configure the IP address of the meter
- ‘Auto Setting’ to have the IP address configured automatically
Under the Network Parameters section you can configure the following settings:
- IP Address
- Subnet Mask
- Gateway
- DNS Primary/Secondary Server
In the Port Settings:
- Modbus Port
- HTTP Port
After making any changes to the settings in this page, you must make sure to click ‘Submit’ so that the changes are saved.
Web Server Mail Settings
You can setup the SMTP function, so that the meter can send data to an email address.
Note: The DNS parameters must be set correctly to use the SMTP functions. The DNS parameters can be set on the ‘Network Settings’ page.
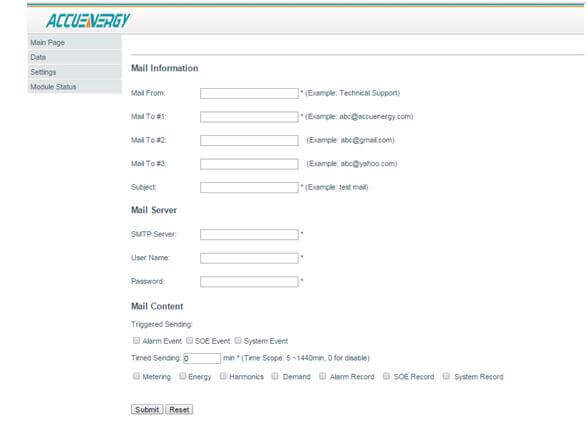
Figure 5: Mail Settings
In the Mail Information section, you can configure the following settings:
- Mail From- Enter a name or phrase which will appear in the email to let you know who this mail is from i.e. ‘Technical Support’.
- Mail To- Enter the email addresses of the recipients you wish to have the email sent to in ‘Mail To #1’, ‘Mail To #2’ and ‘Mail To#3’.
- Subject- Enter a subject which will appear every time the email is sent i.e. ‘Test Mail’.
In the Mail Server section, you must configure the following settings:
- SMTP Server- Enter a valid SMTP server in here i.e. mail.accuenergy.com
- User Name- Enter the SMTP User Name for the SMTP Server set above.
- Password- Enter the SMTP User Password for the user set above.
In the Mail Content select:
- Triggered setting- Select this option if you wish to receive an email anytime there is a new alarm or SOE event
- Timed Sending- Entering a number in this section will send emails at that time period -Check off the content that will be in those emails
Note: Setting the Timed Sending to 0 will disable emails for the Timed Sending option.
Web Server Page Settings
You can change the device description on this page.
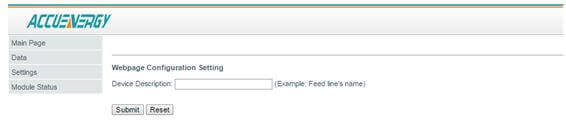
Figure 6: Webpage Settings
Management Settings
This page is used for updating the NET module in the AcuRev 2000 series. If you would like to update the firmware on the AcuRev NET module please contact Technical Support at Accuenergy.
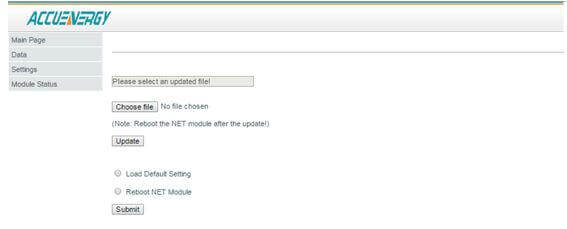
Figure 7: Management Settings
Password Settings
You can change the AXM-NET module/web server password on this page.
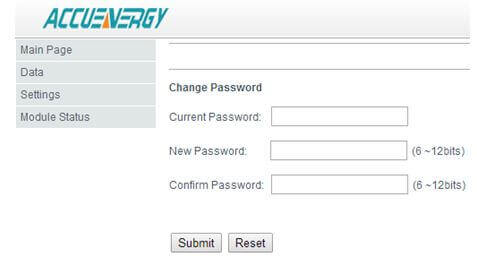
Figure 8: Password Settings
HTTP Push Settings
This page is used to set up the http push function.
Note: This function is available with a special NET module firmware. If you would like to update the firmware on the AcuRev NET module please contact Technical Support at Accuenergy.
Here are the procedures required to set up Http Push function:- Check the “HTTP POST Enable” box to enable the http push/post function.
- There are two options “Post Channel 1” and “Post Channel 2”. This means you can set up data to be pushed to two separate servers.
- Put in the receiving server’s address in the “Post URL” section.
Note:The Post URL must end with ‘/’.
- Put in the ‘Meter ID’, so that the receiving server can recognize the meter and accept the data. This is needed for some servers.
Note: The typical meter ID is: Accuenergy_MACADDESS e.g. accuenergy_ecc38a102157. The Mac address can be found under the ‘Module Status’ section or on the AcuRev unit itself.
- Put in the ‘HTTP Port’ for the server receiving the information.
- Select the required ‘Post Interval’.
- Select the required ‘Post Content’.
- After everything has been set, click ‘Submit’.
The Http Push/Post function has now been setup
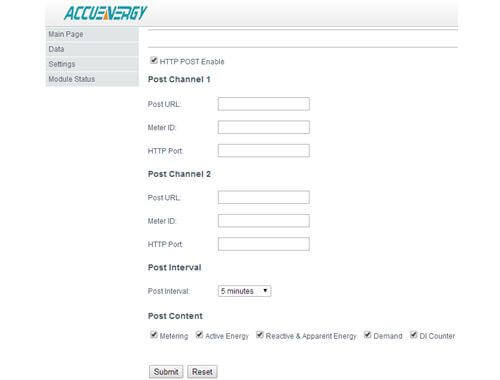
Figure 9: HTTP Push Settings
Module Status
Clicking on Module Status will show the following screen. You can view information about the meter and AXM-NET module from this web page such as the following:
- Meter Model and Serial Number
- Meter firmware version
- MAC address of AXM-NET module
- NET module firmware version
- Meter address
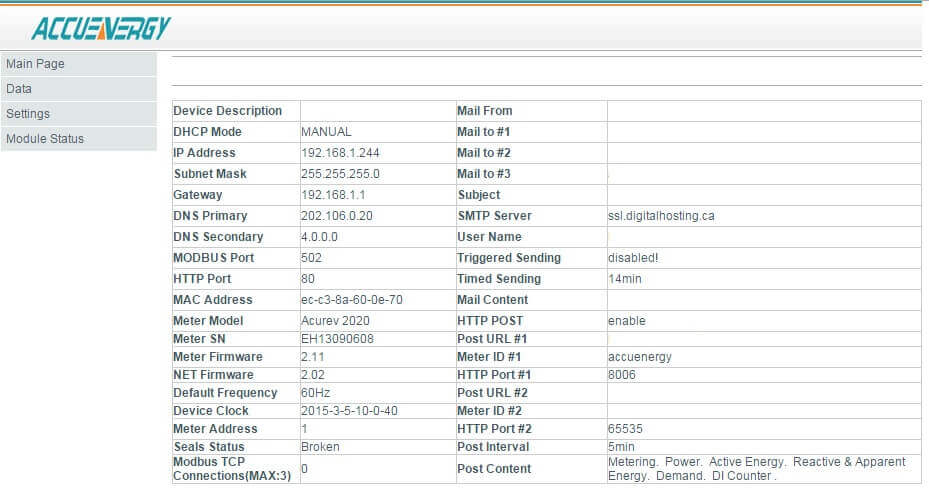
Figure 10: Module Status