
1. Steps to use gmail for SMTP server:
Open the following link:
-
After successfully logging in to your Google account you will see the following page.
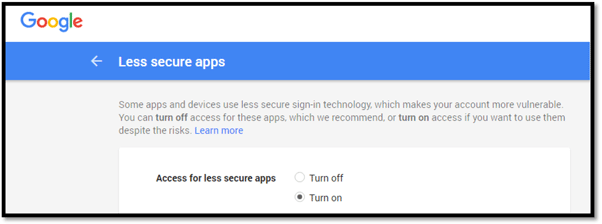
Figure 1
-
Select 'Turn on' Access for less secure apps to give permission to the meter to use your Gmail account as the SMTP server.

2. Configurations
- Type in the IP address of the meter in your internet browser and hit the Enter key. The meter's web login page will display:
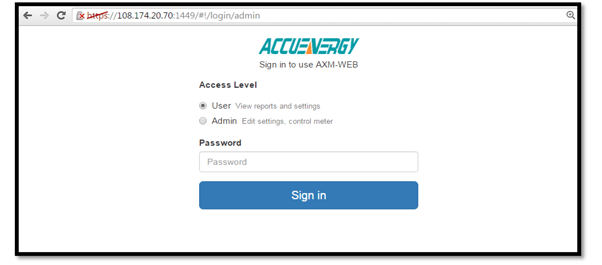
Figure 2
-
Login to the web page as 'Admin'. The default password is 'admin'.
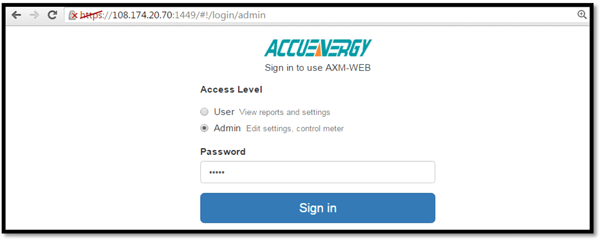
Figure 3
-
Click on 'Settings' from the menu at the top of the web page and select 'Communications'.

Figure 4
-
Select the 'Email' tab on the ensuing page that appears to configure the email settings.
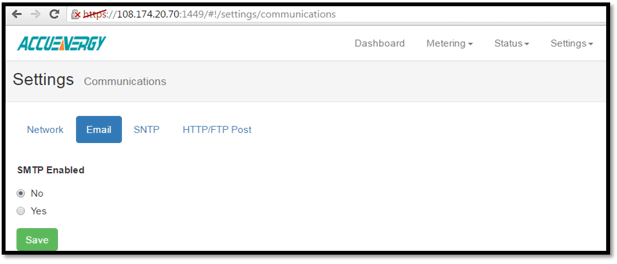
Figure 5
-
Select 'Yes' under 'SMTP Enabled' to enable the SMTP function.
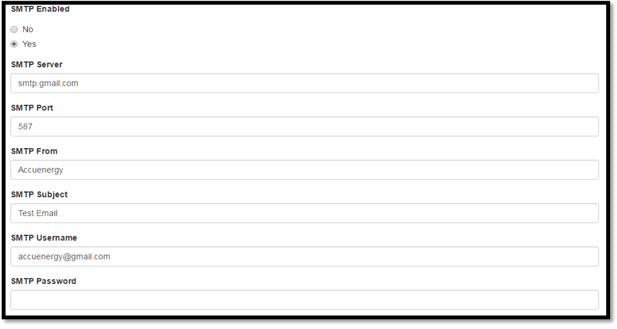
Figure 6
-
After enabling the SMTP function, you can configure the settings as followed:
-
SMTP Server -Enter the following to use the Gmail SMTP server: smtp.gmail.com
-
SMTP Port -Configure the SMTP port to 587
-
SMTP From -Enter a name or phrase which will appear in the email to let you know where the mail is from. I.E. 'Acuvim II Power Meter'.
-
SMTP Subject -Enter a subject which will appear every time the email is sent. I.E. 'Test Mail'.
-
SMTP Username -Enter the username/email address of the Gmail account.
-
SMTP Password -Enter the password for the associated Gmail account set in the SMTP Username above.
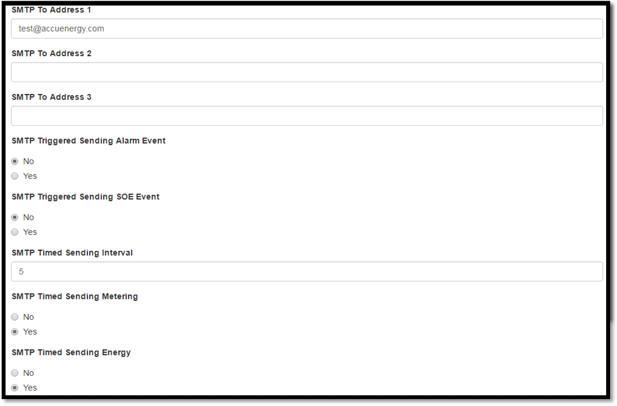
Figure 7
-
-
After enabling the SMTP function, you can configure the settings as followed:
-
SMTP To Address -Enter the email addresses of the recipients you wish to have the email sent to. Up to three recipients can be entered.
-
Select 'Yes' in the "SMTP Triggered Sending Alarm Event"to receive an email whenever there is a new alarm event.
-
Select 'Yes' in the "SMTP Triggered Sending SOE Event"to receive an email whenever there is a new SOE event.
-
SMTP Timed Sending IntervalEnter a numerical value in this section will send emails at that time interval in minutes.
Note: Emails can be sent when there is a new event or it can be sent at specific intervals of times.
-
To receive emails on specific parameters such as Real-Time Metering, Energy, Harmonics and etc. select 'Yes' in the appropriate Time Sending Options. An email on those parameters will be sent out at the Time Sending Interval configured above.
-
Click on 'Settings' from the menu at the top of the web page and select 'Management'.
-
Click the 'Reset' option besides the "Reset AXM-WEB" option.
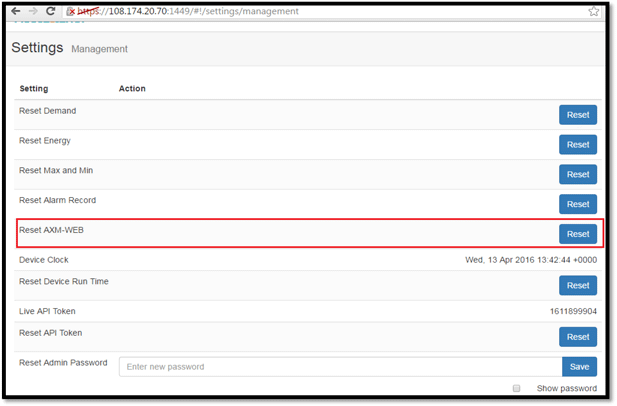
Figure 8
-
You will be prompted to confirm the reset, click on 'Reset'.

Figure 9
-
-
After the reset, the meter will begin to send emails out to the specified email addresses that were configured.


