Product Support
EV300 Software Configuration and Readings
Reading from Software
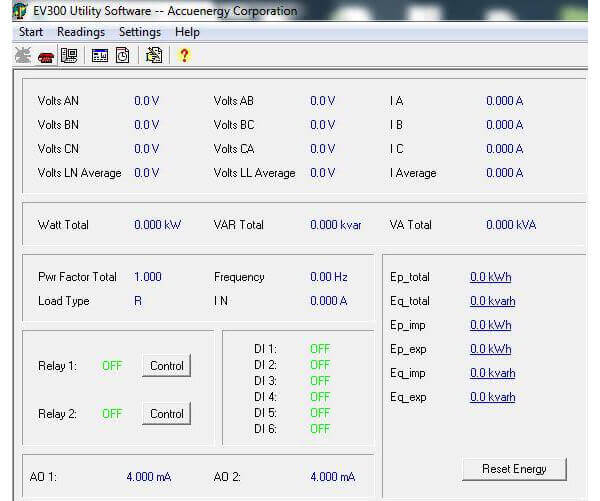
- Click on 'Readings' and then select 'Real-Time Metering' or alternatively click on
 to view the real time data such as the voltage, current, power and accumulated energy.
 - You can also view the status of the Digital Inputs(DI), status of the Relay Outputs(RO) and even control the RO's if they are configured in Latch mode by clicking 'Control'.
- The energy data can be reset by clicking on 'Reset Energy'.
Note: The information on this screen will vary depending on the model number and firmware version of your meter.

Figure 1: Real-Time Readings
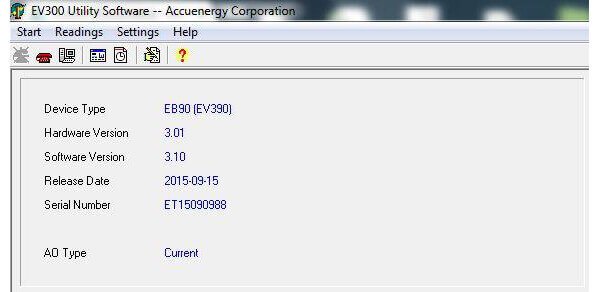
Viewing Information such as Device Type, Hardware and Software Version
- Click on 'Readings' and then select 'Device Information' or alternatively click on
 to view information about the meter such as the device type, hardware and software version of the meter as well as the serial number.

Figure 2: Device Information
Configuring Settings from EV300 Utility Software
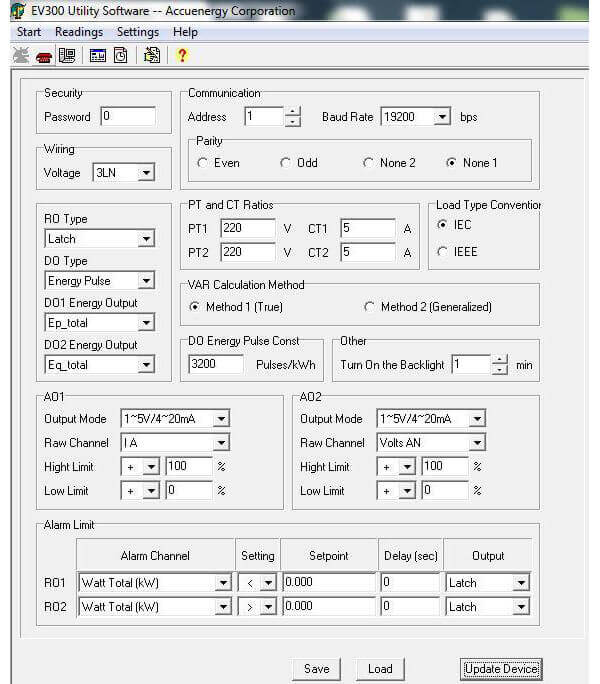
- Click on 'Settings' and select 'General Settings' or alternatively click the
 icon. You can set up the system parameters and configure the I/O settings from this section.
 - Click on 'Update Device' after making any changes so that the changes can be saved to the meter.
Security: You can view and set the meter’s 4 digit password.
Communication: You can set the device address, Baud Rate and parity from this section.
Wiring: Select the required voltage wiring mode. This will be based on your voltage connection. E.g. if it’s a three phase 4 wire connection, select ‘3LN’.
PT and CT Ratios: If there are any Potential or Current transformers being used, their ratios must be entered so that the readings on the meter can be accurate. If no PT's or CT's are being used, leave these settings at the default.
-
- Enter the primary rating of the PT/CT in PT1/CT1
- Enter the rated output of the PT/CT in PT2/CT2
RO Type: This is available if your meter has the 'E1' or 'E4' options.
Choose between the three modes :
-
- Latch: To manually turn on and off the relay
- Momentary: To turn on the relay for a set number of seconds before it goes back off.
- If momentary mode is selected and the RO is turned on it will stay on for 800ms before turning off.
- Alarm: To trigger the relay outputs through an alarm event.
Alarm Limit:Set the Alarm Channel, Setting, Setpoint and Delay (in sec) for the two Relay Output channels; this is needed if the 'RO Type' is set as ‘Alarm’ or if the 'DO Type' is configured as 'Alarm' output.
- Under 'Alarm Channel' select the parameter that will trigger the alarm from the drop down list.
- Select the 'Setting' as either '<' for less than or '>' for greater than.
- Enter the value of the threshold for when the alarm should be triggered in the 'Setpoint' field.
- Enter the time for how long the condition must persist for before triggering the alarm. This can be configured from 1 to 255 sec.
- Select the output mode of the RO when the alarm is triggered.
-
- Select 'Latch' mode to trigger the RO to close contacts as long as alarm persists.
- Select 'Momentary' mode to trigger the RO to close contacts momentarily.
-
DO Type: This is available if your meter has the 'E2' or 'E3' options.
Choose between the two modes:
-
- Energy Pulse: To send pulses of energy.
- Alarm: To output a signal when there is an alarm event.
- Choose the real energy parameters to output through the 'DO1 Energy Output'.
- Choose the reactive energy parameters to output through the 'DO2 Energy Output'.
- Enter the pulse constant for how many pulses are needed to output per kWh in the 'DO Energy Pulse Const'.
AO1/AO2: This is available if your meter has the 'E3' or 'E4' options
-
- Select the 'Output Mode' to configure the output signal as either 4-20mA or 0-20mA.
- Select the parameter you will like to send as an Analog Output from the 'Raw Channel' drop down list.
- Set the High and Low Limit based on the parameter you have selected.
Note:
-
- When AO parameter is set as voltage or current, the upper and lower limit setting range is between 0% - 120%. E.g. it can be set as: 0% - 100%, 0% - 50% etc.
- When AO parameter is set as power, there are four different modes for the upper and lower limit setting range. It can be between: 0% - +120%, 0% - -120%, and -120% - +120%. E.g. it can be set as: 0% - +50%, 0% - -50% etc.
Other:
- You can adjust how long the backlight will be on for in the 'Turn On the Backlight' section. This setting can be configured from 1 to 120 mins.

Figure 3: General Settings
